
Use Deel for profile sourcing to Okta
Learn how to make Deel your profile source for Okta
Deel can act as the source of truth for user identities in Okta, or other SSO providers. Doing so will allow you to create users on Deel, then automatically provision them in Okta using SCIM. This article explains how to configure Deel as the profile source.
In this article:
- Before you begin
- Step 1. Create a SWA integration in Okta
- Step 2. Add SCIM provisioning
- Step 3. Configure SCIM provisioning
- Step 4. Map attributes
- Next up
- Further reference
Before you begin
To complete this setup, you'll need:
- A valid Deel API access token
- The correct Okta tier and permissions that allow you to perform the steps described
The SCIM API doesn't return manager-type users
This guide leverages the SCIM API, which currently only supports worker-type users, manager-type users are not supported.
Step 1. Create a SWA integration in Okta
Begin by creating an SSO integration that supports SCIM. For the integration to work with Deel, it must be a SWA integration.
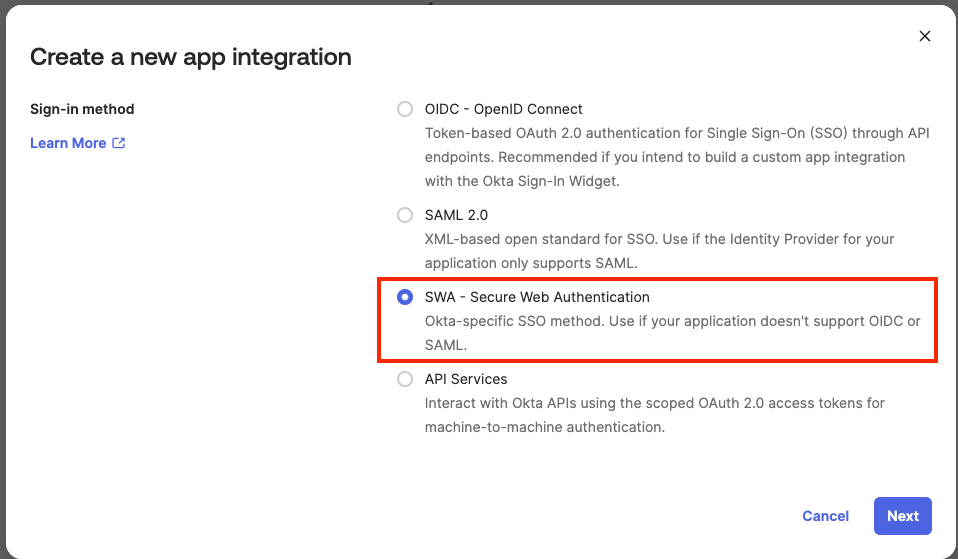
To create an SWA integration:
- In the Admin Console, go to Applications > Applications.
- Click Create App Integration.
- Select SWA - Secure Web Authentication as the Sign-on method, then click Next.
- On the Create SWA Integration page, fill in the details, then click Finish. Make sure you configure the settings as described in the following table.
| Field | Value |
|---|---|
| Who sets the credentials? | Administrator sets username and password |
| Application username |
Step 2. Add SCIM provisioning
- After you create your integration, click the General tab.
- In the App Settings section, click Edit.
- In the Provisioning field, select SCIM, and then click Save.
Step 3. Configure SCIM provisioning
- After adding the SCIM provisioning, click the Provisioning tab.
- In Settings > Integration, click Edit.
- In the SCIM Connection section, configure the settings, then click Save. Make sure you configure the settings as described in the following table.
| Field | Value |
|---|---|
| SCIM connector base URL | https://api.deel.com/scim/v2/ |
| Unique identifier field for users | id |
| Supported provisioning actions | Import New Users and Profile Updates, Push New Users, Push Profile Updates |
| Authentication Mode | HTTP Header |
| Authorization | Enter the access token retrieved from the Deel UI as indicated in Before you begin |
- In Settings > To Okta, click Edit next to the General section.
- Modify the settings as described in the following table, then click Save.
| Field | Value |
|---|---|
| Okta username format | Custom |
| Custom expression | appuser.userName |
- Click Edit next to the User Creation & Matching section.
- Modify the settings as described in the following table, then click Save.
| Field | Value |
|---|---|
| Imported user is an exact match to Okta user if | The following attribute matches: login |
| Confirm new users | Select the option Auto-confirm new users |
Step 4. Map attributes
Mapping based on the default Okta fields
If you have custom fields, discuss the mapping with your Deel representative to get the best results. Most fields are available through the People and SCIM APIs, and others can be mapped through the Custom Fields API. For more information, visit the Developer Portal.
- In Settings > To Okta, locate the Okta Attribute Mappings section.
- Edit the attribute mappings according to the following table.
| Okta Attribute | Value |
|---|---|
Username login | Configured in Sign On settings |
First name firstName | givenName |
Last name lastName | familyName |
Middle name middleName | middleName |
Honorific prefix honorificPrefix | honorificPrefix |
Honorific suffix honorificSuffix | honorificSuffix |
Primary email email | email |
Title title | title |
Display name displayName | displayName |
Nickname nickName | nickName |
Profile Url profileUrl | profileUrl |
Primary phone primaryPhone | primaryPhone |
Street address streetAddress | streetAddress |
City city | locality |
State state | region |
Zip code zipCode | postalCode |
Country code countryCode | country |
Postal Address postalAddress | formatted |
Preferred language preferredLanguage | preferredLanguage |
Locale locale | locale |
Time zone timezone | timezone |
User type userType | userType |
Employee number employeeNumber | employeeNumber |
Cost center costCenter | costCenter |
Organization organization | organization |
Division division | division |
Department department | department |
ManagerId managerId | managerValue |
Manager manager | managerDisplayName |
Step 5. First import
After mapping the attributes, users are ready to be imported for the first time.
To perform the import:
- Click the Import tab.
- Click Import Now.
- Review the mapping information for each user, select the users you want to import, then click Confirm Assignments.

- On the Confirm Imported User Assignments dialog, click Confirm.
Once users are assigned, you can see the assignments from the Assignments tab.
Further reference
This document is largely based on Okta's documentation. Here's the material we consulted to create this article:
- Get started with app integrations (Okta)
- Add SCIM provisioning to app integrations (Okta)
- Create SWA app integrations (Okta)
- What is profile sourcing? (Okta)
- Attribute mappings (Okta)
- Okta Expression Language overview (Okta)
- SCIM technical questions (Okta)
- SCIM API introduction (Deel)
- Plans and Pricing (Okta)
Next up
- Mapping employees to groups (coming soon)
- Offboarding employees (coming soon)
Updated 10 months ago